Thursday, March 3, 2011

February Favourites!

Yes, I am perfectly aware of the fact that every single one of my favourites posts begin with me wondering where all the time went... so let's not break that lovely habit of ours, gals ;) Where on Earth has February gone?! It feels like I was writing my January Favourites just this morning...

As always, L-R :)
  • MAC Satin Taupe - I've had this shadow since last summer, but I never really understood what the hype was all about until this month, when I found out how amazing this colour is! I love this in my crease with just the highlight colour on my lid and the browbone, with a side of heavy liner... lovely!
  • MAC My Highland Honey - this was LE with the Tartan Tale collection (Holiday 2010). It looks almost orange or yellow in the pan and I never thought that I would be able to pull it off, but on my face, it just gives me this beautiful warm glow (it's a satin finish). Haven't really been feeling the regular pink blush look this month, so this blush came as a breath of fresh air into my routine!
  • Make Up Store, Tri Brow Color - I know, I know, this is in almost every blog post here! But that's how much I love it. I´ve been using it on my brows for quite some time (read how I use it here), but this month, I started using this as eyeshadow too - which works brilliantly! Those colours are the perfect colours (for my skintone) for just contouring my eyes, without giving me a made-up look, which regular shadows tend to do. Love, this is so multi-functional! Review coming up soon (though we all know that the word "soon" has a different meaning here on Miss Diorista than in the rest of the world!).
  • L'Oréal's Volume Million Lashes - Really like this mascara, the wand is great and easy to use, and the formula works. You do have to be a bit careful though, so that it doesn't clump (especially with 2+ coats). And it's really black!
  • The Body Shop Liquid Eyeliner - Nothing to say except love :) I've even learned to love the almost-felt tip this has, which I hated at first!
  • MAC 275 - How I ever did my crease without this brush remains a mystery to me. I could do my eye makeup fast asleep with this one - it's amazing, just creates the illusion of a perfect eyeshape with a few brush strokes!
  • Manhattan Eyeshadow Primer - love, love, love. Simple. I don't wear eyeshadow every day, and on a non-shadow day, this keeps my lids non-oily and bright. It also gives any shadow staying power and a satiny sheen! Review coming up ;)
And two non-makeup related things!
  • Lemon Curd - Have you ever tasted it? It is basically a sweet lemon paste... which tastes divine on a toast with some cheese! My every day staple this month ;)
  • The Big C - This TV show is really good. It's about a woman who finds out that she has cancer, decides that she doesn't want to tell anyone, and just sets out to enjoy life as much as possible. But it's harder than it sounds...
That's it for February, I hope that you all had the best month, and wish that March will be even better for you all!

xox,
Miss Diorista

If your heart still hurts, it means that you still care - Anonymous

Saturday, February 26, 2011

Are you scared of your eyelash curler?

I'm that girl who started curling her eyelashes years after everyone else... and then after some time, something happened (I should add that about five beloved eyelashes ended their too-short-lives when that "something" happened ;), I got scared and stopped curling my lashes. I tried a few "curling" mascaras as an alternative, but the results were just not good enough. So I decided to be brave, and now I'm back to my eyelash curler, which has never felt so loved!

I know for a fact that I'm not the only girl who has said no to beautifully curled lashes because of her "fear". So since I got over things and am right now blinking my eyes to show off my lush-lashy lashes (yes, I absolutely had to write that, hah!), I thought I'd share the few tips which helped me when I was healing from the "eyelash curler trauma"! Enjoy!

  • Eyelash curlers simply look scary. That's a fact, we all know it, so get over it and don't let it scare you away. Maybe you could look for a pink one? :)
  • Find the eyelash curler which suits your eye shape. Not all curlers are the same, your friend's favourite might be your worst bet, so ask around (you can usually get help at stores) and find your perfect match. And remember that the most expensive ones don't necessarily have to be the best!
  • Never curl your lashes when you're in a hurry. Always make sure that you have plenty of time, and take all the time you need.
  • Curl your lashes when you're alone, and make sure that nothing and nobody can surprise you when you're curling. I've heard some scary stories in which a person unexpectedly walks by and well... you know the story!
  • Never curl your lashes with mascara on! It really, really increases the risk of you accidentally ripping off all your lashes.
  • Curl with your eye closed (that is, if you're curling on your left eye, keep the left eye closed but the right one open so that you can see what you are doing). It seems to me that everybody curls their lashes with both of their eyes wide open, which I can't understand how is possible. Actually seeing the device in front of my eye freaks me out, which leads to me jerking away, and therefore again, increasing the risk of an accident.
  • If curling your left eye, don't blink your right eye while you´re doing it. You could accidentally blink both eyes, which is a recipe for lash-loss!
  • If your eyes are irritated, or they feel dry, don't even dream of curling your eyelashes. You could accidentally blink your eyes in the middle of curling your lashes.

That's it for the safety tips I've got for you, but for a more beautiful curl, read on ;)

  • First, curl the roots of your lashes. Hold for 3-5 seconds. Then move your curler to the middle of your lashes, hold again for 3-5 seconds, and finally, curl the tips of your lashes. This method will give you very beautifully and completely curled lashes.
  • Waterproof mascara usually tends to hold the curl a bit better throughout the day than a regular one, but keep in mind that waterproof formulas are usually harder to remove and can dehydrate your lashes, so don't use it every day!

I really hope this helped some of you! Really, I found out myself that there is nothing to be afraid of if you're just careful enough, and do things slowly, so don't be scared!

xox.
Miss Diorista

P.S. Picture from http://morningbounce.wordpress.com/

“Do not spoil what you have by desiring what you have not; remember that what you now have was once among the things you only hoped for.” - Epicurus

Friday, February 25, 2011

Weekly Gratitude: Moms, Pancakes, Sun and Snow

Another week has flown by, and people, I love doing those posts. It's only my second Weekly Gratitude post (for further info, click the cute-as-a-button button to your right on this site!) but I'm already in love with them - realizing how easy it is to find things to be grateful for, is a truly amazing feeling, and it makes you realize how lucky we really are. Yes, we all have bad days, but everything has a bright side to it - sometimes you just have to open your eyes and you heart and look for it!

A few of the things I've been grateful this week:
  • Thank you for the insanely beautiful sunlight that Reykjavík (my city) has had today - it's not sunny, but just so bright somehow... I feel like I'm in the middle of a fairy tale-ish movie!
  • Thank you for the 5 minutes of snow we had an hour ago - it made my day to hear it bounce off my window (I love how the weather in Iceland can go from sunny to windy to snowy and back to sunny in half an hour!).
  • Thank you to my mom for randomly deciding to bake us all pancakes - mom, your pancakes are the best!
  • Thank you to my friends who share my passion for fun and funny things - life wouldn't be the same without your jokes, girls!
  • Thank you for inspirational quotes - I've been rediscovering my love for those. I'm now even adding them to some of my posts! (Check out the ones which I've already posted here)
  • Thank you to Halldór Laxness (an Icelandic Nobel Prize-winning writer who passed away a few years ago) for creating such fun, unforgettable and unique characters who will always live on in Icelanders' hearts.
  • Thank you to God, for allowing me to experience how truly amazing the world can be when you just open up your heart and believe.
I could go on, but I think we'll leave it there for now ;) Please join us, it's easy! Just head over to your blog (or make one if you don't have one ;) and blog about all the things you're grateful for those days. It feels great, spread the word, people!

Yours,
Miss Diorista

P.S. Picture from http://pursuingholiness.blogspot.com/


“A friend is someone who dances with you in the sunlight, and walks with you in the shadows.” - Anonymous

Thursday, February 24, 2011

Sally Hansen - Xtreme Wear Nail Color in Emerald City

Oh my, isn't this pretty?!? Just looking at it makes me feel so good, lol! I recently hauled this polish (haul), and I'm sorry how long it has taken me to get the review up for you. Want to know why? Well, I like to take my polish off before reviewing, so that I can tell you if it's a pain to remove, and how long it lasted before it started chipping. Usually, a polish starts chipping on my nails on either the 3rd or the 4th day of wear. That's normal. This one went 6 days without chipping! So that is why it took me so long!
This colour is really beyond beautiful. I don't own a lot of green nail polishes (but I do love the colour green so I'm on the hunt for new ones - I'm thinking mint green and lime green!), but this one is simply stunning. The colour is exactly what the name describes - a shimmery emerald green. However, what really made me fall head over heels, was how it changes with different lighting. It can be a darker, Christmas tree-kind of colour, or a beautifully bright, emerald green (in natural sunlight). I love it, and got so many compliments on it!

As I mentioned, it went 6 days before starting to chip - Sally Hansen clearly hit the spot with her Xtreme Wear formula! Also, the polish didn't take too long to dry, which I had expected since it is long-wear. That's nice!

Removing was a breeze - you would expect something different when dealing with such a pigmented, green colour which can be on the darker side, but nope. So easy!
Lastly, here is a comparison between the Sally Hansen Xtreme Wear brush (upper) and a regular OPI brush. As you can see, the bristles are just slightly shorter on the Sally Hansen one, and the brush is also slimmer.

Product (65%) - 9/10
Value (10%) - 8.5/10
Would I repurchase? (15%) - 9/10
Packaging (10%) - 7.5/10

Overall - 9/10

Love,
Miss Diorista

P.S. I've decided to include inspirational quotes at the end of my posts when I feel like it. If you have any that you would like to appear here on Miss Diorista, please e-mail them to me ;) Here's the first one:

"Is all that we see or seem, but a dream within a dream?" -Poe

Saturday, February 19, 2011

Weekly Gratitude and a little update

Have you noticed the cute little "Weekly Gratitude Participant!" button, to the right on my blog? If you haven't, take a look. And better yet, click it! It will take you to the lovely blog Love, Life, Lace, which is sure to brighten up your day!

Weekly Gratitude is a movement, founded by the owner of Love, Life, Lace, and it works like this: If you are a participant, you write down (once a week) all the things for which you are grateful. This is my first week participating, and I´ve been loving it. From now on, I will be posting those Weekly Gratitude posts once a week here on Miss Diorista. I don't want to necessarily tie them down to one certain day, but I suppose I will mostly publish them on weekends - maybe Fridays or Saturdays.

And now on to the little update. I've decided to give "Friday Health Posts" a little break for some time - unless you want them to continue. It's just that finding new challenges, recipes and bits of knowledge for those posts is a whole lot of work - which I wouldn't mind doing if you like reading them, but I feel that those posts haven't been doing so very well lately... So I´m giving them a rest. I might take them up again though.
And please comment to tell me whether or not you would like to see the Friday Health Posts on Miss Diorista in the future - if you want them, I will continue writing them :)

And finally, what I´ve been grateful for this week - I've decided to write down one thing for each day of the week, so they're seven. Enjoy!
  • Thank you for frozen popsicles, since they were the only thing I could eat when I caught the cold this week.
  • Thank you for cough mixture.
  • Thank you for the blue skies, which I'm looking at right now and make me happy.
  • Thank you for the full moon the other night, it was one of the most beautiful things I have ever seen in my life.
  • Thank you mom, for making me feel a whole lot better when I was sick this week.
  • Thank you to my body, for having already almost fought off the terrible cold.
  • Thank you to Maja, you are a great friend :)
Finding things you're grateful for is a whole lot easier than you probably think - try for yourself and see :)

Love,
Miss Diorista

Thursday, February 17, 2011

Nail Polish Haul - Star Gazer

 I feel like I'm flooding you with nail polish posts! It's fun ;)
I had never even heard of this company, Star Gazer, when I came across their nail polishes in a costume shop in Reykjavík... ever heard of it? Well, their nail polish looked interesting and I instantly fell in love with the "crystal ball" packaging, so I had to buy some! Enjoy my haul!

L-R:
  • The first one is Nr. 134 (kind of sucks that these don't have names, only numbers... names are so much easier to remember!). This one is way brighter in real life than it is on the picture, it's a hot red, pink colour with blue-ish shimmer/glitter.
  • Nr. 121, a beautiful dark copper colour with shimmer. Changes entirely based on lighting, though (as they all do, in fact).
  • Nr. 132. A grey, gunmetal, silver, taupe... colour? Mix those colours together and you'll get the one in the bottle... and don't forget to throw a handful of shimmer in there, too! Can't wait to wear this one.
All of the colours look extremely unique, and are unlike anything I've seen before. I really hope the formula is good, because those could be possible keepers!
Only thing I noticed right away that they're missing, is a shaker ball or two. Nail polish needs shaker balls!
UPDATE: I found a shaker ball in one of them (the grey one, Nr. 132). But why not the other two?!

Love,
Miss Diorista

Monday, February 14, 2011

How to Clean Your Makeup Brushes

 A friend of mine asked me the other day how I clean my makeup brushes, so after telling her, I thought I'd share it with you guys too, just in case some of you were wondering :)
This is how I clean my brushes, but the method is not any way mine; I picked this up on YouTube. So let's dive in!

There are two ways to clean your brushes; spot clean and deep clean.
  • Spot cleaning doesn't cleanse your brush entirely, but you use that method if you are for example using the same brush for many colours and don't have the time to deep clean in between. With spot cleaning, the brushes dry very quickly, so you can use them again in just a few minutes.
  • Deep cleaning cleanses your brush way better, and it is very important to deep clean your brushes at least twice a month (some people say every week but I don't think any of us have that much time...). If doing makeup on many people the same day, you might also want to deep clean in between. With deep cleaning, the brushes need at least one night to dry (preferably 24 hours), so make sure that you aren't going to need the brushes anytime soon after deep cleaning them!
Spot Cleaning

What you will need:
* Makeup remover wipes - any kind
* Eye makeup remover or brush cleanser

1) Take one face wipe and lay it out on a flat surface.

2) Holding the wipe down with one hand, take your brush in the other and start sweeping it back and forth on the wipe. You'll notice how makeup will start coming off. Be gentle to your brush!


Sweeping my MAC 239 back and forth
3) If your brush is extremely dirty, you might want to pour a few drops of either eye makeup remover or brush cleanser on your face wipe. It will help get the makeup off the brush. This is not always needed.

4) Once makeup stops coming off your brush, you can use it again for the next colour!


Deep Cleaning

What you will need:
* Baby shampoo
* Olive oil
* A sponge (like the ones you would use for your kitchen - but make sure you don't get kitchen sponges mixed up with makeup sponges!)
* Hand sanitizer - optional, and it's for your hands, not your brushes!
1) I like to use hand sanitizer on my hands before I get started - that way, no bacteria will transfer to my brushes.

2) Pour a bit of baby shampoo on your sponge and rub it in a bit with your finger.

3) Start sweeping your brush back and forth where you put the shampoo. You will see makeup coming off.
Sweeping my MAC 188 back and forth


Rinsing my GOSH blush brush
4) Now rinse your brush's bristles with lukewarm (not hot, not cold) water. Very important: Never get any water above where the metal part of your brush meets the handle! It will ruin your brush.

5) Squeeze the bristles very gently, and if the water that comes out is still dirty, repeat steps 2-4 until the water comes out clear.


My GOSH blush brush, reshaped after rinsing
6) When the water comes out clean, gently squeeze the water out of the brush's bristles, and reshape it with your fingers, so it won't dry in a funky shape.

7) Lay your brush out to dry on a flat surface covered with a towel. Let the bristles hang out from the towel so that they dry quicker, and preferably tilt the surface down a bit, so that the brush heads (bristles, that is), are positioned slightly lower than the handles. This will help the water get out the right way, and stop it from getting into the metal part. (See the picture at the end of this post).

Rinsing my Nature's Minerals kabuki by The Body Shop
For kabuki brushes:
Do the normal routine, but in step 4, try to only get water on the end of your bristles. That is where most of the product is anyway, and if any water gets too high up in the kabuki, it will get into the handle, which will ruin your kabuki.


Using olive oil for my lip brush by The Body Shop
 For lip brushes, eyeliner brushes and extremely dirty brushes
After step 1, pour a little bit of olive oil on your sponge, and sweep your brush back and forth. Rinse the sponge and the brush, then resume with step 2-7.
Why olive oil? Because it will help break down the product, especially wax-based ones, like lipstick and eyeliner. 

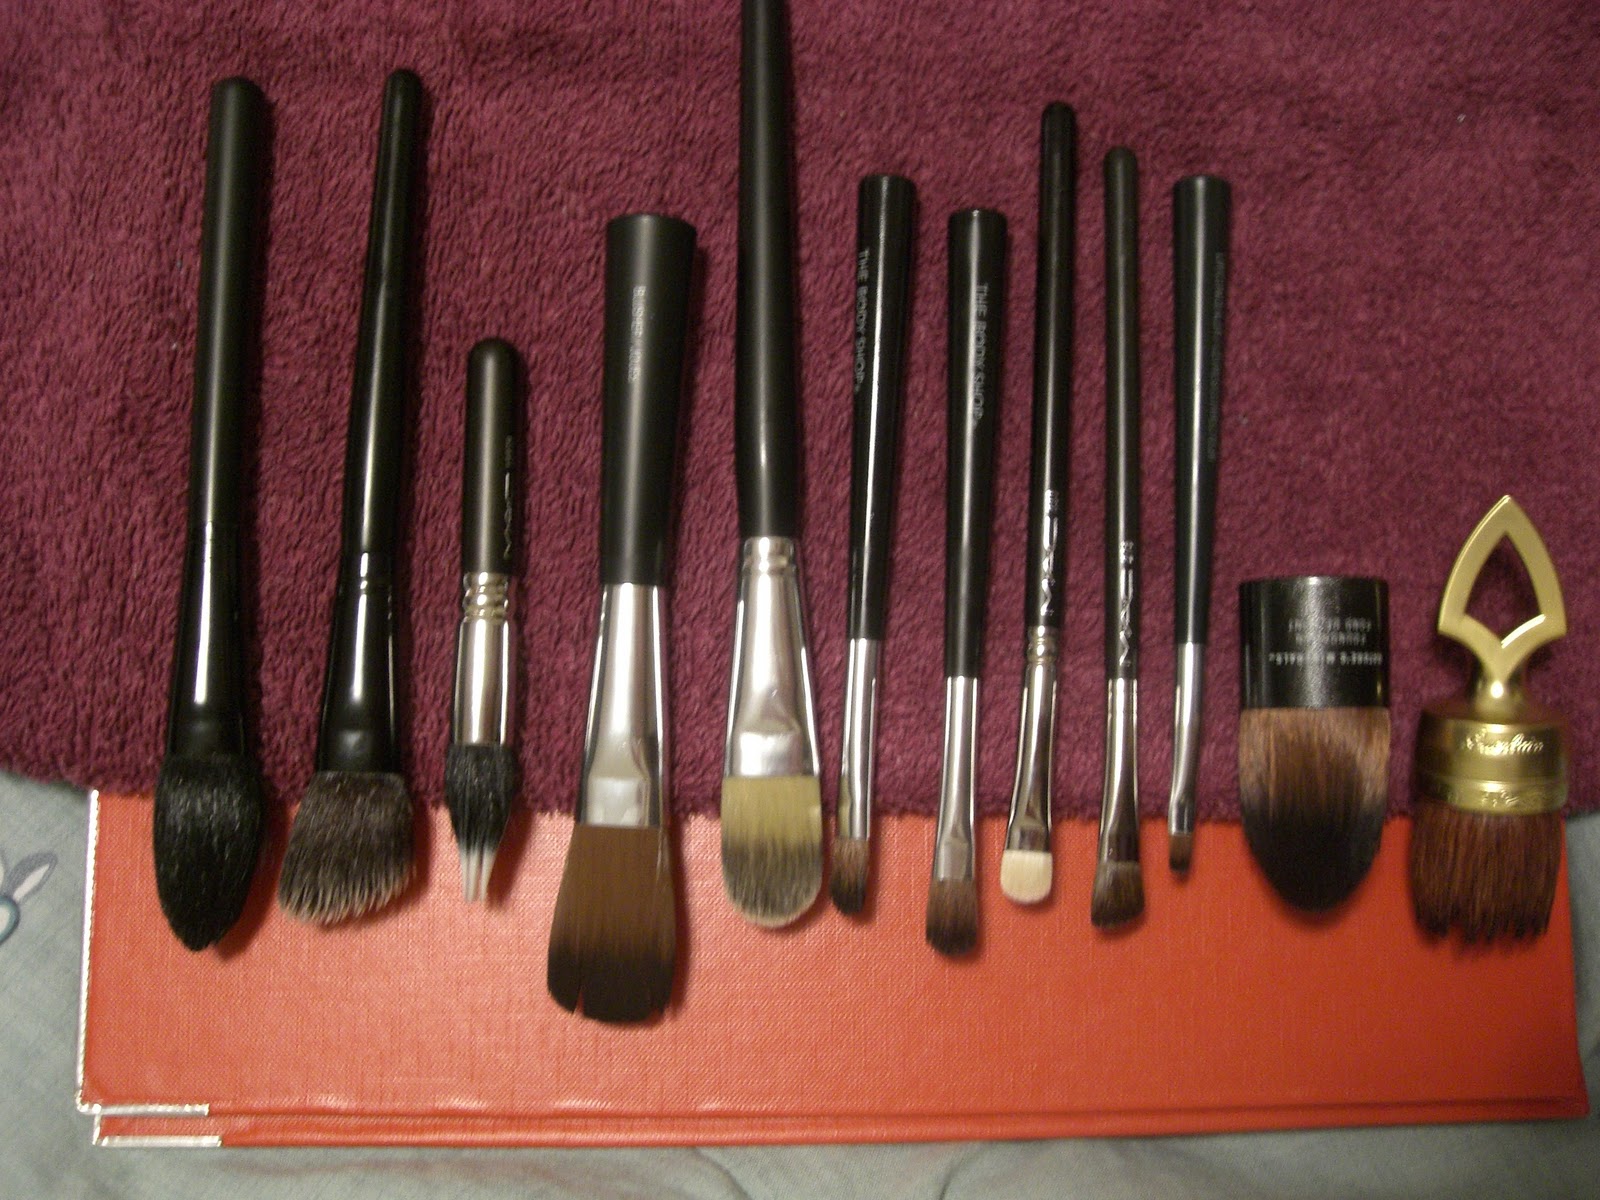
And here they are, all so clean and lined up for drying!
I prepare my "drying surface" by laying a towel on top of an empty cardboard file holder. Again, let the bristles hang out a bit so that they will dry faster.

Allow your brushes to dry for at least overnight, preferably 24 hours. Also, I´ve noticed that brushes by The Body Shop take way longer to dry than other brushes (must be the material they use for the bristles...), so give those a good amount of time.

I really hope that you enjoyed this and maybe learned something!

xox,
Miss Diorista
Related Posts Plugin for WordPress, Blogger...