Showing posts with label brushes. Show all posts

Thursday, February 16, 2012

MAC 239 vs. Sigma E55

Before purchasing my Sigma brush kit a year ago or so, I tried asking around on MUA, which brand people liked better for brushes, Sigma or MAC. By that, I quite frankly meant: Are the MAC brushes so much better than the Sigma ones, that they are worth me spending so much money on them.
Obviously, people had different opinions. However, I noted that one person told me that the Sigma ones can do just as good a job as the MAC ones - except for the MAC 239 brush, which that person said simply could not be duped.
Lucky for me, I already had the MAC 239, so I decided to purchase a Sigma Make Me Blush kit, and definitely do not regret it. Don't get me wrong - I do own a few MAC brushes and I absolutely love them - but I also feel that spending so much on brushes doesn't really make sense, when I can get almost the same thing for a lot less. I'm not a professional makeup artist, makeup is my hobby, so why not just spend the extra money on actual makeup, then?
And yes... I do admit that the fact that Sigma has pink brushes, might have played a small role... a girl never gets too old for a little bit of pink!

Above to the right, you can see the MAC 239 brush (the lower one) and the Sigma E55 (the upper one), which is supposed to be a "Sigma version" of the MAC one. Both of these brushes are meant for packing colour onto your eyelids.

Now, as you can tell from the top picture, and the one to the left, the Sigma one is bigger and thicker. This is both a good and a bad thing. Since the MAC one is smaller, it can fit into the corner of your eye more nicely and it is precise enough to be used for placing shadow under your lower lashline as well - the Sigma one is too big for this. I also find that the MAC brush delivers more colour to the eye - the shadow's pigments seem to transfer better with it.
However, the Sigma brush does a good job when dealing with glitter - and it is my go-to brush for that. That being said, I don't use glitter on my eyes very often, so for me, the MAC brush is a winner here.

Definitely worth the money, and although you don't feel like splurging on all the MAC brushes, I think you should check the MAC 239 out - it will be your best friend before long!

What do you think? Have you tried either one of these brushes? Tell me!

Love,
Miss Diorista

Tuesday, August 16, 2011

Dior - Cannage Couture Collection Brush Set

Talk about travelling in style! I bought this beautiful set of four travel-sized brushes when I was in Germany in March (at the airport, to be specific). I wanted to give it a good share of use before reviewing it, but quite frankly, I didn't have the time until I travelled to Edinburgh two weeks ago - I decided to bring only these brushes with me (I did take an eyeliner brush as well though, and an angled one for my brows) - so after a whole week of using almost only these brushes, I believe I have enough to tell you what I think of them.
As you can see, the travel set come in this beautiful purse (perfect for both travelling and , and to be honest, my favourite thing about it is the "D" on the zipper. So Dior-ish!
The purse has a mirror inside, a sleeve for each brush and a nice cover to protect the brushes and the mirror - it feels rubbery, so makeup won't stick to it.
As you can see, these brushes aren't going anywhere - they each have their own little pocket, an elastic band for holding them in place, and a plastic cover for protection. Very, very professional.
The set comes with four travel-sized brushes - (from L-R) a lip brush, an eyeshadow brush, a blush brush and a foundation brush.

The lip brush is nice to have, very precise and does a great job at applying lipstick. Personally, I would have picked another brush for a travel set  - an eyeliner brush for example, but I guess it's nice to have, especially if you like strong lip colours, which tend to need precise application.

The eyeshadow brush is a medium at density - meaning that it can be used for both packing on colour, as well as putting shadows in the crease and blending them out. I have to admit that I don't use this brush on an every day basis, but I did use it every day for a week when I was in Edinburgh, and it does work - I got beautiful looks from it, and even managed to use it for smudging shadow under my lower lashline. So yes, I will definitely use this for travelling in the future, although I don't use it at home.

The blush brush is my favourite from the set - although that may not come as a surprise, I'm a blush gal :) It's very soft, and I used it both for bronzing and blushing - it's small enough to work for contouring, yet big enough to give a blended look when working with blush or highlighter. I would say that it's on the smaller side, but it is a travel-sized brush after all, and I do like it.

The foundation brush is to me the least interesting brush of the set - but that being said, I really, really don't like classic foundation brushes at all, this one is no exception. I feel that they leave my face streaky, and I always have to re-do my makeup if I decide to give them "one more try". I just don't understand how people can use them, to be honest.


So, do I recommend this set? Well, if you are looking for a really nice travel brush set, I think you will like this, especially if you use classic foundation brushes. The brushes are really well made, the bristles are fantastic and the handles are so classy, with the Dior logo printed so nicely on them. I'm really happy with mine.

Love,
Miss Diorista

Thursday, May 19, 2011

Sigma - Sigmax Synthetic Face Kit

My new love! This kit from Sigma includes the following three brushes:
  • F80 - Flat Top Kabuki
  • F82 - Round Top Kabuki
  • F84 - Angled Top Kabuki

All of these brushes are made from the synthetic Sigmax HD filament, which is specially made to produce a flawless finish, using liquid, cream and/or powder products.

The brushes are very easy to use and wash, although they do take quite some time to dry after wash. Make sure that you don't have to use it the next 12 hours or so before you wash it. I have not noticed any staining, but you have to take care when you wash them, to reach the hairs in the middle, which can be tricky because of the density.

F80 - Flat Top Kabuki
This brush has to be my favourite from the three, and it is the best foundation brush I've found so far. It is also very versatile; the flat surface is perfect for buffing in foundation, as well as blending out blush or bronzer.

F82 - Round Top Kabuki
This brush is great for achieving perfect blending under your eyes. After I've applied my concealer and set it with powder, I run this brush once or twice below each eye, and my concealer doesn't crease the whole day! This is also good for blending around your nose, because of the round edges.

F84 - Angled Top Kabuki
This brush blends together products on your cheeks very well, because of its shape. This is also very useful if you wear both blush and bronzer, but don't want to see where the blush ends and the bronzer begins. I usually only blend with this brush, I don't dip it into the actual product (the same goes for the other two brushes).

Top to bottom: Flat, Round, Angled Top Kabukis.

I do love all three brushes and use them very much, but the one I use the most is the F80 Flat Top Kabuki. I honestly think that if you want to (or if you're on a budget), then you can purchase only this one and skip the other two, since it can actually do everything the other two can do. That being said, if you are very serious about your makeup, you might find the other two very useful. I know I certainly do.


L-R: Flat, Round, Angled Top Kabukis. I love how dense these are!


Product (65%) - 9.5/10
Value (10%) - 9/10
Would I repurchase? (15%) - 10/10
Packaging (10%) - 9.5/10 (They came very safely packaged and in a blue pouch)

Overall - 9.5/10

xox,
Miss Diorista

Tuesday, April 12, 2011

Haul from Berlin (part 8) - Dior

We have come to the last part of my haul from Berlin, and yes, it is Dior. Of course :) As you will see, I didn't really go overboard with Dior this time, and decided that I rather wanted to spend money on, well, I guess you can call those "special edition" products. That is, those are (apart from the lipstick) products which I can't really get here in Iceland. So enjoy this final part of the haul!

L-R:
  • Rouge Dior Lipstick in Mazette (028) - This is a gorgeous bright coral - perfect for spring and summer. Love, love, love it! And it's so fun to know, that each of the 32 Rouge Dior shades are inspired by Dior Haute Couture gowns - what a brilliant idea, a lipstick shade for each dress!
  • Cannage Couture Collection Brush Set (Collection Voyage) - In English, this is a travel brush kit. How ingenious, a travel brush kit with brushes from Dior! I've always wanted to try their brushes, and I had heard that their blush brush was amazing, so I of course had to take this little one home. The kit comes with 4 brushes - a classic foundation brush, a blush brush, an eyeshadow brush and a lip brush. The brushes are all mini sized, and come in a "wallet" with the classic Dior quilt print. Very elegant and pretty!
  • The Scents of Miss Dior Chérie - As I've told you before, my favourite perfume is Dior's Miss Dior Chérie printemps...so basically, my heart did a little flip-flop when I saw this absolutely beautiful set of 4 mini-perfumes from the "Miss Dior Chérie" range - you have Miss Dior Chérie L'eau, Miss Dior Chérie Eau De Toilette, Miss Dior Chérie Blooming Bouquet and Miss Dior Chérie Eau De Parfum. How adorable!

This completes my haul from Berlin. I really hope that you enjoyed these posts, and yes, you can be expecting many of the hauled items to be reviewed during the next few weeks :)

Love,
Miss Diorista

The moment we shared might only have lasted a few seconds, but the memory will never fade. - Anonymous.

Sunday, March 13, 2011

Sigma Brushes - Haul and First Impressions


 The mailman must have thought that I was kind of crazy, jumping up and down like that when he delivered my Sigma brushes some days ago! You should have seen me... or his face :D ok, no, I didn't really jump up and down... but I did so in my heart ;)

I ordered two sets of brushes, one "Make Me Blush", which holds the classic twelve brushes from Sigma (in pink!), as well as a genius brush carrier which snaps into two brush holders! I also bought the "Synthetic Face Kit" (also known as the "Sigmax brushes"), which holds three differently shaped kabuki brushes, made for giving you an airbrushed finish.

Brushes from "Make Me Blush"
  • Small Angle - E65
  • Medium Angled Shading - E70 - (This is a dupe for MAC 275, which I love!)
  • Large Shader - E60
  • Pencil - E30 - (Great for a cut crease, but a tiny bit scratchy...)
  • Large Angled Contour - F40 - (I love this for both my blush and contour colour!)
  • Large Powder - F30
  • Duo Fibre - F50 - (Comparable to MAC 187)
  • Foundation - F60
  • Concealer - F70
  • Tapered Blending - E40 - (Good for blending, but I find it way too big for applying colour to my crease.)
  • Eye Shading - E55
  • Eyeliner - E05
 
Isn't that mouse just so adorable?
And of course I had to get them in pink! I did think about it for a while, and was afraid that it would be too pink and I'd get bored with it after a while. However, it isn't too pink at all, and I don't see myself getting bored with those brushes anytime soon! Pink is so much more fun than black :)


Brushes from the "Synthetic Face Kit":
  • F80 - Flat Top Kabuki - Probably the most multi-purpose one of the three, but I mainly use it for buffing my foundation in.
    F82 - Round Top Kabuki - I have found this one great for blending in tricky places, like around my nose and even under my eyes.
  • F84 - Angled Top Kabuki - I use this for blending together blush and bronzer (or just blush/bronzer, depending on what I'm wearing).


Here they are, in the same row as in the description above. They all feel very sturdy and are actually quite heavy. I've been really loving those since I got them!

And finally, Sigma sent me a gift with my purchase: A travel sized E25 blending brush. It's so cute :) I haven't gotten around using it much, but from what I've tried, it's a good size for my eyes, both for blending and for applying shadows to my crease.

Whew, 16 new brushes! I get overwhelmed just thinking about it :) And I love them all :P

Don't forget to participate in my giveaway!

Love,
Miss Diorista 

P.S. I will post reviews on those brushes once I've used them a bit more :)
In life, we all have unspeakable secret, irreversible regret, unreachable dream and unforgettable love. - Diego Marchi
(I love this quote, because sometimes, all those things combine into one...)

Monday, February 14, 2011

How to Clean Your Makeup Brushes

 A friend of mine asked me the other day how I clean my makeup brushes, so after telling her, I thought I'd share it with you guys too, just in case some of you were wondering :)
This is how I clean my brushes, but the method is not any way mine; I picked this up on YouTube. So let's dive in!

There are two ways to clean your brushes; spot clean and deep clean.
  • Spot cleaning doesn't cleanse your brush entirely, but you use that method if you are for example using the same brush for many colours and don't have the time to deep clean in between. With spot cleaning, the brushes dry very quickly, so you can use them again in just a few minutes.
  • Deep cleaning cleanses your brush way better, and it is very important to deep clean your brushes at least twice a month (some people say every week but I don't think any of us have that much time...). If doing makeup on many people the same day, you might also want to deep clean in between. With deep cleaning, the brushes need at least one night to dry (preferably 24 hours), so make sure that you aren't going to need the brushes anytime soon after deep cleaning them!
Spot Cleaning

What you will need:
* Makeup remover wipes - any kind
* Eye makeup remover or brush cleanser

1) Take one face wipe and lay it out on a flat surface.

2) Holding the wipe down with one hand, take your brush in the other and start sweeping it back and forth on the wipe. You'll notice how makeup will start coming off. Be gentle to your brush!


Sweeping my MAC 239 back and forth
3) If your brush is extremely dirty, you might want to pour a few drops of either eye makeup remover or brush cleanser on your face wipe. It will help get the makeup off the brush. This is not always needed.

4) Once makeup stops coming off your brush, you can use it again for the next colour!


Deep Cleaning

What you will need:
* Baby shampoo
* Olive oil
* A sponge (like the ones you would use for your kitchen - but make sure you don't get kitchen sponges mixed up with makeup sponges!)
* Hand sanitizer - optional, and it's for your hands, not your brushes!
1) I like to use hand sanitizer on my hands before I get started - that way, no bacteria will transfer to my brushes.

2) Pour a bit of baby shampoo on your sponge and rub it in a bit with your finger.

3) Start sweeping your brush back and forth where you put the shampoo. You will see makeup coming off.
Sweeping my MAC 188 back and forth


Rinsing my GOSH blush brush
4) Now rinse your brush's bristles with lukewarm (not hot, not cold) water. Very important: Never get any water above where the metal part of your brush meets the handle! It will ruin your brush.

5) Squeeze the bristles very gently, and if the water that comes out is still dirty, repeat steps 2-4 until the water comes out clear.


My GOSH blush brush, reshaped after rinsing
6) When the water comes out clean, gently squeeze the water out of the brush's bristles, and reshape it with your fingers, so it won't dry in a funky shape.

7) Lay your brush out to dry on a flat surface covered with a towel. Let the bristles hang out from the towel so that they dry quicker, and preferably tilt the surface down a bit, so that the brush heads (bristles, that is), are positioned slightly lower than the handles. This will help the water get out the right way, and stop it from getting into the metal part. (See the picture at the end of this post).

Rinsing my Nature's Minerals kabuki by The Body Shop
For kabuki brushes:
Do the normal routine, but in step 4, try to only get water on the end of your bristles. That is where most of the product is anyway, and if any water gets too high up in the kabuki, it will get into the handle, which will ruin your kabuki.


Using olive oil for my lip brush by The Body Shop
 For lip brushes, eyeliner brushes and extremely dirty brushes
After step 1, pour a little bit of olive oil on your sponge, and sweep your brush back and forth. Rinse the sponge and the brush, then resume with step 2-7.
Why olive oil? Because it will help break down the product, especially wax-based ones, like lipstick and eyeliner. 

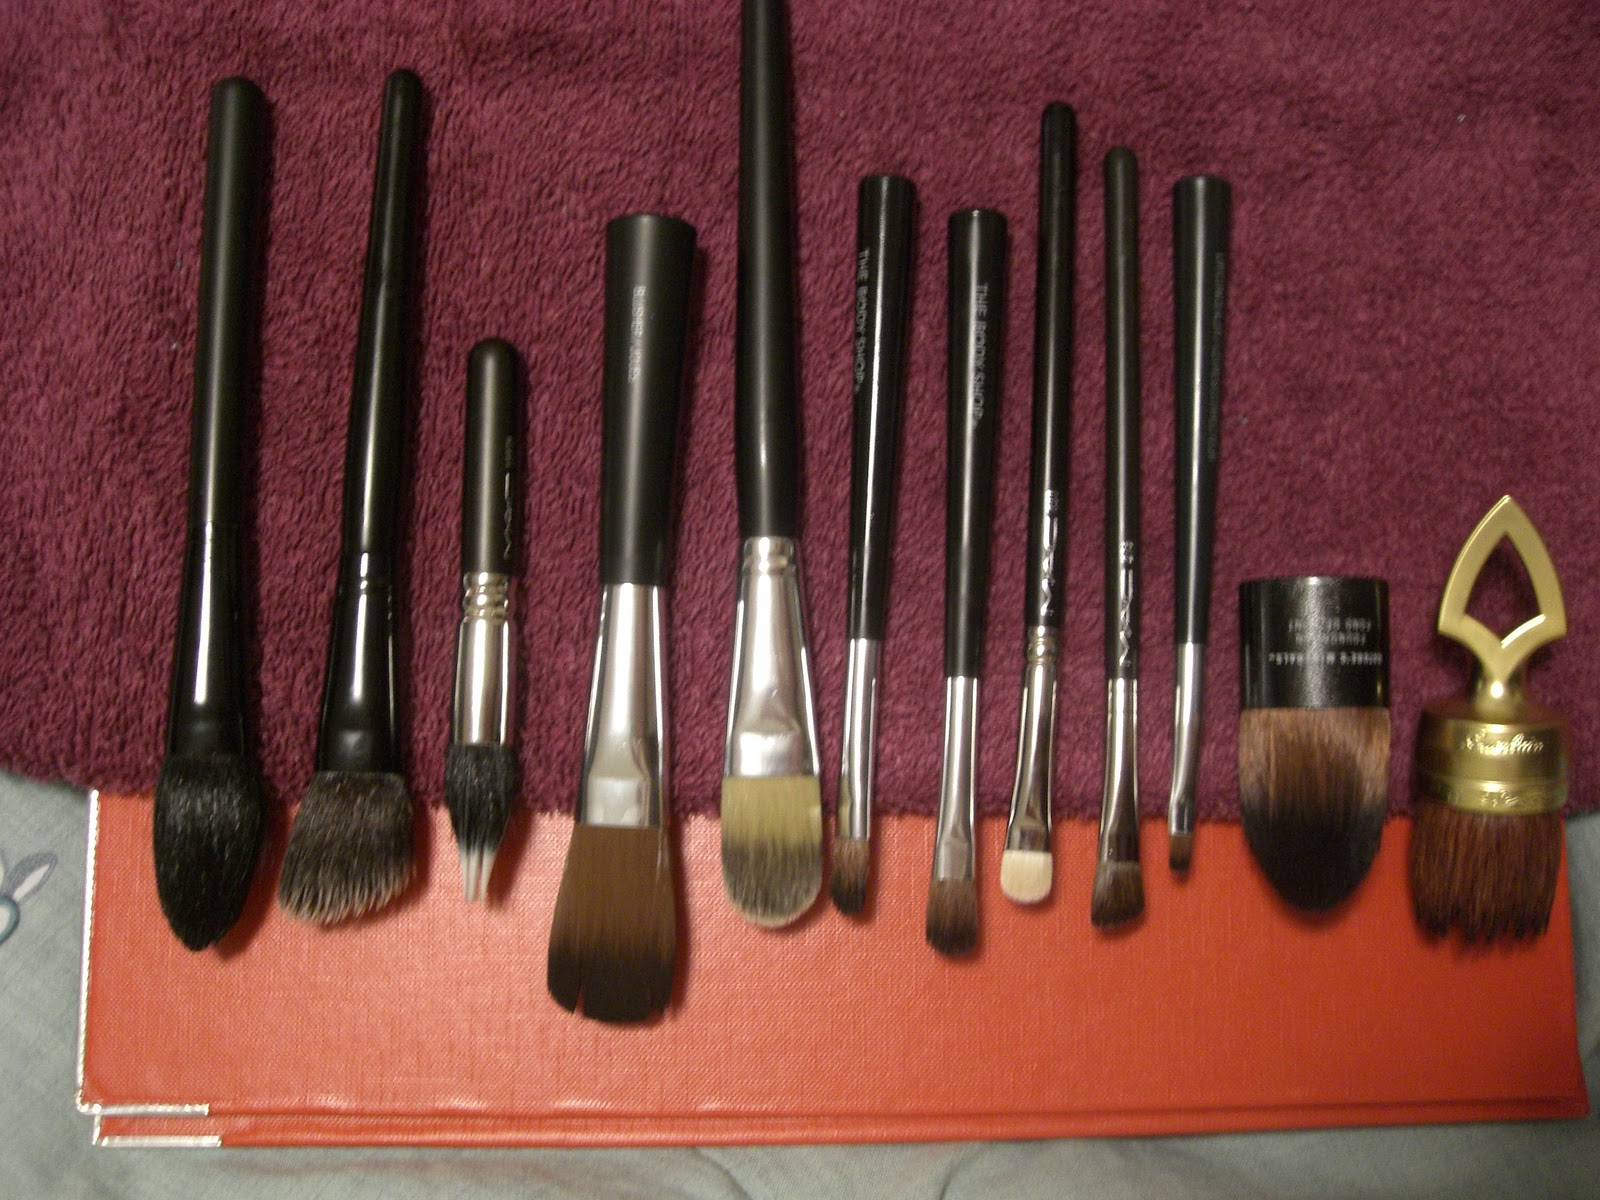
And here they are, all so clean and lined up for drying!
I prepare my "drying surface" by laying a towel on top of an empty cardboard file holder. Again, let the bristles hang out a bit so that they will dry faster.

Allow your brushes to dry for at least overnight, preferably 24 hours. Also, I´ve noticed that brushes by The Body Shop take way longer to dry than other brushes (must be the material they use for the bristles...), so give those a good amount of time.

I really hope that you enjoyed this and maybe learned something!

xox,
Miss Diorista

Monday, January 3, 2011

Get Pretty Brows!

Our eyebrows are something which really shapes and literally makes our face. Therefore, it is very important not to forget them in your daily beauty routine. It only takes about one or two minutes every morning to dramatically change your whole look by paying a bit of attention to your brows!

1) Tweezing
In order to be able to spend just two minutes on your brows every morning, you need to have them in the correct shape. Now there are many ways to achieve this. You can tweeze yourself, or have it done by a professional. Many women prefer going to a professional at first, and then they keep their brows in shape by themselves. Some go to a salon every now and then, others just for the first time. Personally, I always tweeze my brows myself.

Quick tip: At first, I just tweezed a little bit every night, until my brows had the shape that I wanted. This way, I avoided the pitfall of overplucking, since I had a day in between tweezing session, which I could use to decide where I wanted to tweeze. After this, I just made it a routine to check my brows when I take off my makeup at night. If I see any hairs where I don't want them, I just pluck them, and that's how I keep my brows looking like I want them to look.


2) The upper brow-line

For steps two and three, you are going to need a product similar to the one you see pictured above. I mentioned it in the post about my favourite products of 2010 (read about it here), and it is the Tri Brow Color by Make Up Store. I love this product, because it has all three colours that I need for my brows, and those colours last on my brows all day. So much easier than using three eyeshadows!

All right, now onto the actual step! You can see this in a video on YouTube from MakeupByTiffanyD, but basically, you brush your eyebrows down, dip an angled brush like the one above (love it, by The Body Shop) in the two lighter colours (mix them to get your correct colour - it should be lighter than your true brow colour) and just run it on the upper brow-liner. This gives them fullness. Now brush your eyebrows back into their regular shape.

3) The lower brow-line

Blonde hair: Using the same angled brush, mix the same colours as in step two, and run them across the lower brow-line. You can fill in any gaps, make your brows fuller and create a bit of a tail. Be careful, though, to stay more or less roughly within your natural brow shape, otherwise your brows will look fake. This is why step one is so important.

Brunette hair: Using the same angled brush, mix the two darker colours, but be careful with the darkest one - it is almost black. Run this across your lower brow-line, but focus on areas where you need more fullness - for most people, this is the tail, but if you have any gaps, you want to fill those in too. Take care to stay more or less rougly within your natural brow shape, though, otherwise your brows will look fake. This is why step one is so important.

And you're done! Your brows should look pretty, full and defined. Step one and two are the steps I do each morning. If you wish to, you can add the extra step of using a brow gel to hold your brows in place.

For more definition: If you want even more definition, you can conceal around your brows, using a flat, stiff concealer brush (I love The Body Shop's lip brush for this) and a concealer in the colour of your skin. This makes brows stand out even more.

Did you know? Fuller brows make your face look slimmer, whereas thinner or overtweezed brows tend to make your face look fuller.

Love, Miss Diorista

P.S. First picture is from www.weddingssource.com. The second one is mine.

Sunday, October 10, 2010

September Hits!

Yes, I know that it's the tenth of October... but I still really want to do my September favourites, so I decided to just forget the calendar for a few minutes! Please turn all forgetful with me, will ya?

First of all, you see Sprinsheen blush by MAC. Do I love this. I wore nothing else the first two weeks after I got this. I absolutely love this. Did I tell you how much I love this blush?

The little pink pot is a concealer, the Erase Paste by Benefit. I'm in the lightest shade, nr. 1. This is a really creamy concealer, stays on all day and covers really well. Yes, it does crease a little bit, but I can live with that :)

And the powder you see is also by Benefit, the Hello Flawless! It is a powder which is supposed to cover like a foundation. I really love this. It covers up pretty decently, and feels good. I'm in the shade "Gee, I'm swell, SHELL". Only downfall is that I am going through this pretty quickly... on the other hand, I have been using it almost every day for about two months now, so maybe that's why I'm seeing pan already!


Here, you see the... long things. Yeah. Good explanation of my behalf, wasn't it? Okay then, Miss Diorista. Let´s see your long things!
First up is my favourite mascara so far, the Voluminous by L'Oréal. This is just beyond words, makes my lashes long and lush, doesn't clump and is very black. I don't like it when mascaras say "black", but come out looking all gray. This one says black, and is black.
The brush is an e/s blender by The Body Shop. Sure, it's a good blender, but the reason it's here, is that it is a great brush for creating subtle shadows for an everyday look. If you just want that extra depth/emphasize on your eyes, without it looking like you have any eyeshadow on, then this is your brush. Love it, have been using it constantly.
Yes, I've been on an eye-lining rush lately... the first one is by Clinique, a Cream Shaper for Eyes in 103, called Egyptian. It is a beautiful kind of khaki green colour. Really dark though, and looks black once on. Just not quite as harsh, which I why I love it. Also really creamy, so to prevent smudging, I would set it with some dark e/s.
The white eyeliner is by Sisley, it is a Kohl eyeliner, in Snow. Has some subtle shimmer to it, and is just a dream. Creamy enough to be used on your waterline, yet doesn't smudge. However, it is also creamy enough to be used under your brow as a highlight... so this is a wonderproduct, I'm telling you! Creamy when it has to be and non-creamy when it is supposed to be exactly that! Lol!
The last long thing I've got to show you is a Velvet Eyeliner from GOSH, in 01 Blue Moon. It is a beautiful blue colour. Not a bright blue, just... the perfect blue. I love it! Adds some bling to your eyes without being too overpowering!

Here are some swatches for you guys. On top is the Springsheen blush, then the eyeliners. First is Egyptian, then Sisley Snow, finally the GOSH one.
So, what have you been loving for the month of September? Please tell me, I'd love to know!
And leave any requests for product reviews in the comments ;)
Yours,
Miss Diorista

Wednesday, October 6, 2010

The Body Shop - Fall Haul!

Remember back in summer, when I posted some pictures of the gorgeous fall collection that TBS has this fall? Well, probably not :) But anyways, I finally had the time to drop by and I picked up a few items... let's have a look, shall we?

So, here you can see all the products that I got. Of course, I mainly went there to get the blush :) I got mine in the Berry shade, but the other one is a bronzy one (called Chestnut). It was quite nice looking as well, but first of all, I thought it had too much of a metallic look to it, and also, it was maybe a bit too bronzy for my fair skin? Well, I don't know why, but somehow, I just wanted the blush. I'm just addicted to blushes! I really love this blush. Just screams "fall"!

Then, I got one of the three e/s that came out with the collection. This one is in Velvet Green (the others are Peach and Midnight Blue). It is dark green, with loads of green and gold shimmer/glitter to it. Very pretty, but a bit fall-out-y. I actually got this one for the purpose of using it to set the green kajal that I bought.

I also got a green kajal, the shade is called Evergreen. I haven't really tried it out yet, but it sure looks pretty :)

The last thing I got was the blush brush. It is very soft, but not the greatest one for swirling your blush on. Good for precise application, though.

And now the swatches!

First, you see the eyeliner. To the left, it is swatched alone. Then, it is swatched with the green e/s on top. Do you see how the colour just comes alive? Wow. So pretty. Perfect for a "fall" night out! To the right is the e/s on its own.
Then, below those swatches, you can see the blush shades. There are four on top. Starting from the left: A brownish colour, a very pretty pink colour, a cranberry colour (my faveourite) and a highlight colour. Below those, they are all blended together.

A side look at the blush brush. It is rather slim for a blush brush, don't you think? I actually find that it works a bit better as a brush for setting makeup with pressed powder. Does a wonderful job in that area.


And finally, I have here two pics of the beautiful blush. The one above is with flash, the one below is without it. Just decided to post both, so that you could get a better idea of the blush.


So, what do you think? Have you bought anything from the Smoke and Fire Collection, or will you be buying something? And don't you just love the lovely pattern on the blush?
If you have any requests for product reviews, I'd be happy to post those for you, so please leave them in the comments :)
Yours,
Miss Diorista

Friday, September 3, 2010

Haul from Germany (part 4) - Brushes, tools and mascaras

We are slowly making our way through this huge haul, and now we are coming to the fun part! This part of the haul is all about brushes, tools and mascaras. Enjoy!


Starting from the left:
1) The first brush is simply HG! It is amazing! I had been looking for a good brush for contouring for so long, and was really going to buy the MAC one. Then, I stumbled upon this little sweetie, by a company called Fabiani. And you have no idea how nice this brush is! It is really soft and does not scratch my face, it has a comfy handle, it picks up product easily but not too easily... it is my new fave!
'
2) The second brush is your basic foundation brush. It is nice and I really do like it and use it a lot, but it does not come close to the Fabiani one!
'
3) The sponges are by Fabiani, and so is the eyelash curler. I'll start with the curler. I don't curl my eyelashes every day, but when I do, I like them to be perfectly curled. This curler does the job nicely. The thing I like the most about it, is that it came with two or three extra "pads", so even if they get dirty, you don't have to throw the curler away (even so, remember that it is really bad for your lashes to curl them after applying mascara. They can break or fall out. Try to curl before mascara ;)
I have not used the sponges yet, but I'm hoping that they will allow a sheer but nice coverage when used damp... I also really like the fact that they come in a sturdy box (nice for travelers).
'
4) We'll go through the mascaras, starting from the left. First up is L'Oréal's Volume Million Lashes. It is a rather new one, and has a "wiper", which is supposed to stop the mascara from clumping. I do like this mascara, but somehow I would not use it for every day.
In the middle is quite possibly my HG mascara... it is the L'Oréal's Voluminous. I had heard such good things about this one, that I just had to buy it. And yes, it is very nice! Adds volume and length, and is one of the blackest mascaras I've ever tried! This is supposed to be a dupe for YSL's Faux Cils, but I haven't tried that one, so I can't tell you:)
The last mascara is Helena Rubinstein's Lash Queen. I have only used this one two or three times, so I have to wait and tell you more when I know more!
'
If you want any product reviews on those, let me know in the comments!
'
Yours,
Miss Diorista

Friday, July 2, 2010

June 2010 Favourites

Yes, I know I'm a bit late with this maybe, but still, I wanted to let you guys know what I've been loving this June! So let´s get started!


This one is to the side, just flip your computer if you can... or tilt your head! This is OPI's Chicago Champagne Toast. A really pretty pinkish plum colour, and a nice break from this season's bright corals!


This beautiful blush to the left is simply love, love, love. It is in shade 02 and it is by Golden Rose (I got in a pharmacy). I have absolutely been loving the gorgeous pink glow that it gives. You can see it swatched on the bottom.
The lipgloss is by GOSH and the shade is 0058. This is a really nice rosy pink colour with shimmer. Looks good on its own but is still sheer enough to be put over lipstick. It is swatched on top.


The lipgloss is 6H Glam Shine in shade 103, called Forever Nude, by L'Oréal. My aunt gave this to me for my birthday in April, and I love it! Love the texture, the colour, the shimmer, the consistency, the packaging, everything! It is a pinky nude, wearable enough to wear on its own but simply outstanding over lipstick! It is swatched on top.
The lipstick is my favourite lipstick, and it is by Dior, in shade 559, called Rose Drama. It is so wearable, a pinkish mauve colour, with a hint of plum maybe, and has a beautiful sheen to it. No chunky glitter here. Very sophisticated and goes brilliantly with the L'Oréal lipgloss. Swatched on the bottom.


This is a beautipowder by MAC, and it came out with the Liberty of London collection. It is called Shell Pearl, and the name really tells you all about it. This is a gorgeous pale pink powder. I love the pearly sheen it gives, and I use it either as a pale blush or over another blush to give me that nice, pearly look. Great to wear out in the sun!


FYI, you're looking at a miracle product here! This is Cover All Mix (in the lighter shade) by Make Up Store. I don't use the red colour, and the lightest shade I only use to prime my eyelids (works well as a primer, but not as a concealer!), but it's the green shade that I'm in love with! I use it on my chin and nose to conceal any redness that I have and this works wonders, covers well and blends in perfectly. Does not look green on the skin!


This is probably my number one summer product (though I do use it a lot no matter the season, this is one of my makeup collection's stars!). It is Dior's Diorskin Poudre Compacte in shade 001, called Transparent Light. I use it either to set my makeup or as a 'foundation' on those "almost no makeup days". It makes my skin look healthy, even and it mattes the areas which get shiny in summer (my forehead and my nose) without making them look powdery, chalky or 'made-up'. Just beautiful.


This is my summer foundation, Nature's Minerals by The Body Shop. Mine is shade 03. This is a powder foundation, but it gives me a very glowy, almost dewy look, and does not feel or look powdery at all. It is very sheer coverage, but on the other hand it looks so natural. The kabuki brush is necessary to apply it and I love this brush, so dense and soft.
This is it for now, I hope you enjoyed and please comment and tell me your favourites, or if you have tried any of the products above!
Dior-ish regards,
Miss Diorista
Related Posts Plugin for WordPress, Blogger...