Tuesday, February 8, 2011

My Current Foundation Routine

Some of my favourite posts to read are all kinds of routines - foundation routines, skincare routines, blush/bronzer routine... you get the idea :)
So I thought I'd share my own foundation routine with you. This is my liquid foundation, I'll post my powder foundation one later (which is quite simple, though...). But let's get into it, hope you enjoy it ;)

  1. First off, I prime my face with the Smashbox Photo Finish Foundation Primer, using clean fingers. Now I love this stuff, but I've been hearing from people who break out from it, so be careful... try before you buy :) 
  2. I like to put on foundation before concealer, so next up is my current go-to foundation, Dior's Nude Foundation. I prefer using my fingers for this foundation, I just make sure they're clean. I can't say enough about this foundation!
  3. Now my foundation is in place, I can see where I need some extra coverage. I'm currently using Bobbi Brown's Creamy Concealer under my eyes, but I also use Benefit's Erase Paste. If I have anything else than has to be concealed (for example redness on my nose and/or chin), I generally use the "green" side of Make Up Store's Cover All Mix. This stuff really hides redness. Again, I use my clean fingers for both concealers.
  4. For a setting powder, I've been using Dior's Diorskin Poudre Compacte in "Transparent Light" for quite some time now. I use the included sponge for this powder, and I feel it actually does a great job.
That's it! Really quick and simple, and I've been using this same routine for a little over a month now... ever since I got the Dior Nude Foundation actually :)

What is your fave foundation routine? Please tell me in the comments! Oh, and don't forget to include your favourite foundation, I'm always on the hunt for new ones to try out.

And finally: Have you tried Sigma brushes? What did you think of them? I'm looking into buying a brush kit from there...

Yours,
Miss Diorista

Dior - Diorskin Nude Natural Glow Sculpting Powder Makeup SPF10

That has to be the longest product name in history... (if you know a longer one, though, let me know!)
I have talked about this product to you before, and it is a powder foundation - that is, a powder, which covers like a light foundation. If you read my blog on a regular basis, you probably know that I love powder foundations. However, there are a few "extras" about this one, which made me fall completely head over heals:
  • The compact itself is beautiful, can be carried around easily, and has a special place for a small brush/sponge.
  • You not only get powder foundation, but also blush and highlighter, in the same compact!
  • When you're done with the powder, you can buy a filling, instead of having to buy a whole new compact. Environmentally friendly :)
 Now on to the product itself.
 
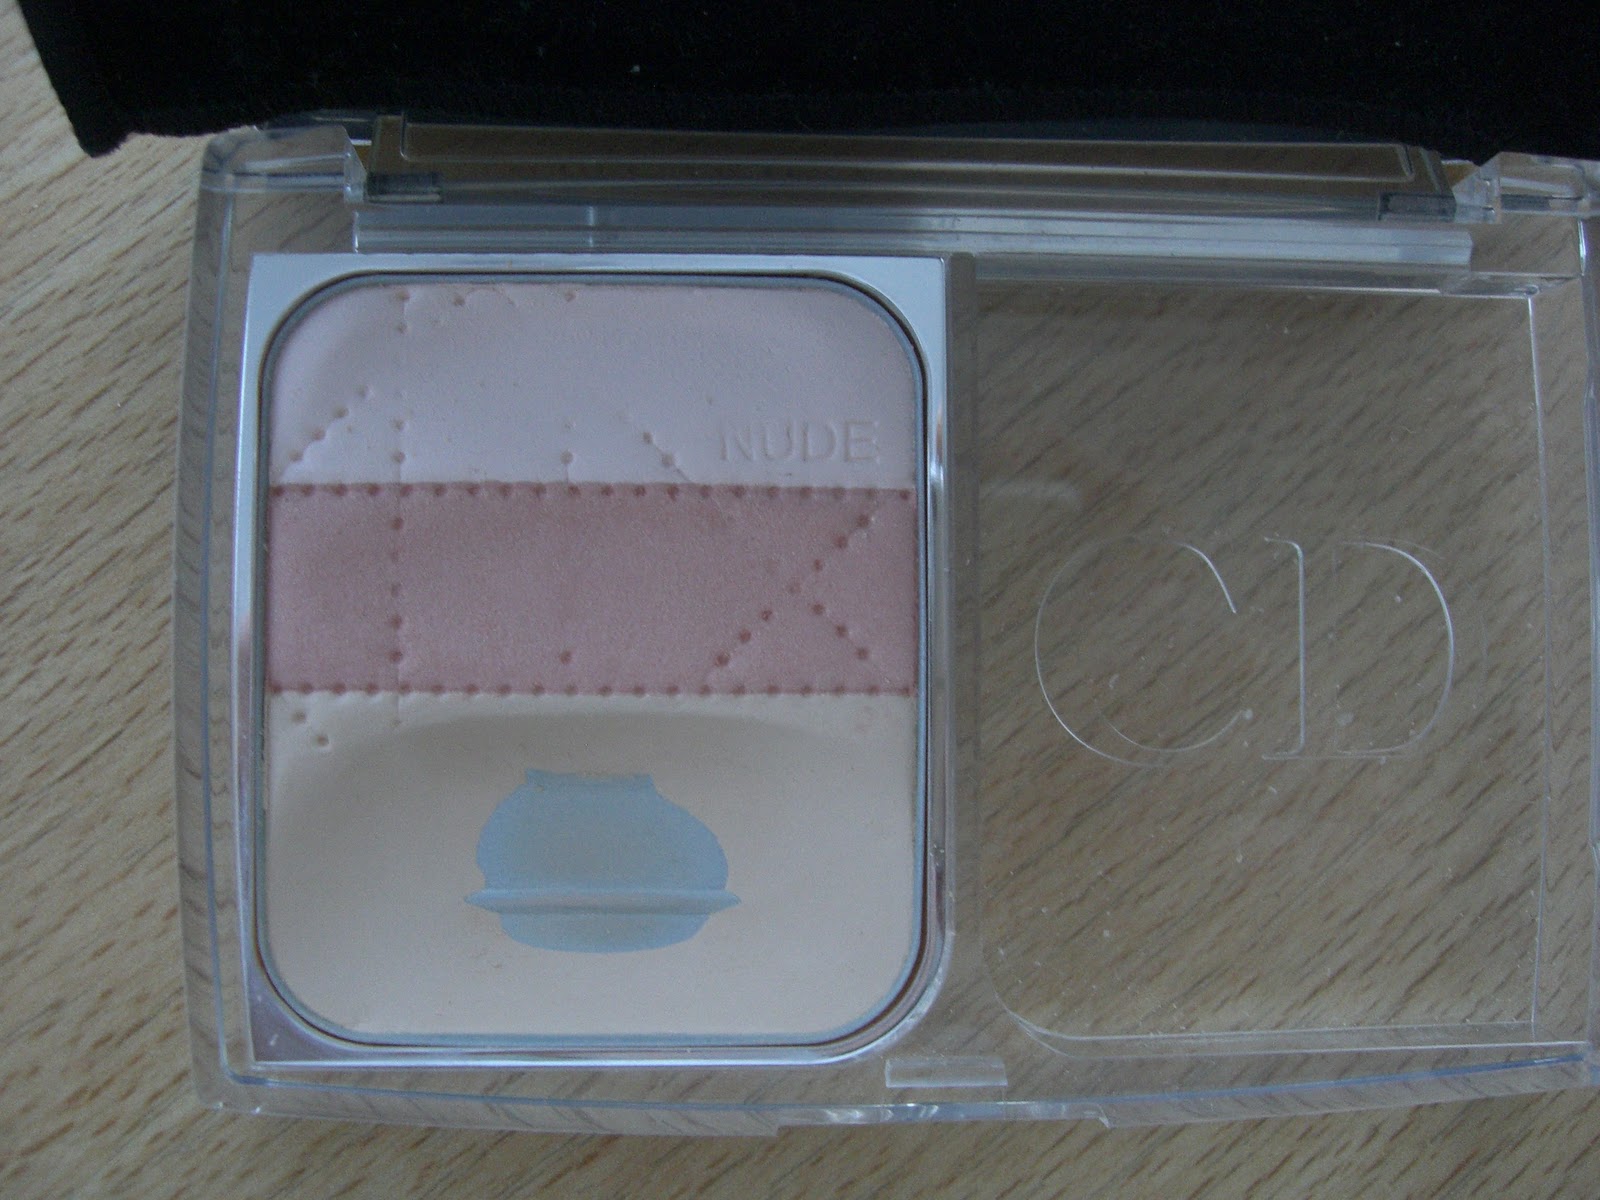
 This is what the product looks like (mine is in shade 020, called Beige Praline).
It comes with an accompanying brush, which is actually usable if you want very sheer coverage, but I don't use it so I couldn't find it... sorry :S

You can see I've already hit pan on the foundation part, which is the lowest one. The middle part is a beautiful peachy blush with some shimmer to it, and the top part is a matte highlighter. Let me tell you, I'm in love with this highlighter! Nothing makes my nose look slimmer than this ;) All the powders are very smooth and easy to work with (I like using a sponge for all of them).

The foundation gives me even coverage, it is definitely buildable, but covers light to medium. The average wear-time is about four hours (maybe five) before I have to touch it up. This product can also be used as a setting powder, over liquid foundation. I even think my foundation looks slightly more natural with this powder than without it. However, most of the time I wear this product by itself.

I tried swatching those for you, but my camera was giving me a hard time with the lighting and all... but as I said, the blush is a light, fresh peach with shimmer, and the highlighter is a soft, slightly pinkish white/beige.

The only obvious downside I can see to this product, is that you go through the foundation part so much quicker than the blusher and the highlighter, since you alternate those more. This can be a problem when you want to buy a new filling for the compact, but still have more than enough of blush and highlighter. However, I don't mind this problem, since I really love the foundation.

Product (65%) - 9/10
Value (10%) - 8.5/10
Would I repurchase? (15%) - 9/10
Packaging (10%) - 9.5/10

Overall - 9/10

Love,
Miss Diorista

Monday, February 7, 2011

Nail Polish Haul!

First of all, sorry for the post-overload from me today! This is the last one, though :) I just have so many posts that I want to get up for you... and also this new Blogger system is really helping, since you can make blog posts in advance now! Yay for that ;)
So on to the nail polishes!
 
L-R:
  • Those two polishes, the blue and red ones, I'm so excited about! They're by Depend Cosmetics, which I believe is a Sweden brand, and they are a part of their "Cracked Effect" collection. In case you've heard about or purchased OPI Black Shatter, then those polishes do the same thing - when worn on top of another polish, they crack and shatter as they dry, leaving you with a unique nail design on every nail! I can't wait to try those out! And the colours are simply "Red" and "Blue". I believe they also carry black, white, pink and purple.
  • And finally, I bought Sally Hansen's Xtreme Wear Nail Color in shade 10, called Emerald City. I've been lemming this for some time, since it's seems to be a beautifully deep, shimmery green, but couldn't find it anywhere until now. You should have seen my face when I grabbed the last one they had ;)

 
Been buying any nail polishes lately? I'm on a nail polish kick, so if you know about any great nail polish blogs (I already read and love Varnish Vixen ;) then please let me know!

 
Love,
Miss Diorista

How to Contour by Mixing Blushes!

I mentioned in my January Favourites post that I've been loving mixing together blushes. I'm so excited to share this technique with you, since it's not a traditional way to contour, but definitely a fun one!
There is of course no wrong or right in this area - this is just how I do it. Enjoy!
What you will need:
  • A matte, mauve-ish blush
  • A bright blush, shimmer or non-shimmer
  • A regular blush brush
  • If your bright blush is very pigmented, then you will also need a duo-fibre brush
  • A kabuki brush

This is the kind of colour that you want for your "matte and mauve-ish" colour - I love using The Body Shop Cheek Colour in Nr. 2 (pictured) for this.

This girl will act as our "model" today :)
With your regular blush brush, pick up some of that matte colour and put it right below your cheekbones, working from the upper part, and not going any further than halfway down your cheekbones (that is, stop right below where her eyebrow ends. Don't put any of this colour on your cheekbones, though, just below them. Blend well, for example into your hairline, but don't overblend, you want your blush to really define (that is, contour) your cheekbones.

Now for the fun part, take a little bit of your bright blush, smile, and place it right on the apples of your cheeks! I'm using Make Up Store's blush in Frozen Daiquiri, and MAC 188 to apply it. Be careful not to use too much of this bright blush, it is simply meant to act as a "pop of colour" :)
Finally, blend between the two blushes so that there are no harsh lines - but again, don't overblend. This look is supposed to be very defined!

So that is it - simple, isn't it? I first saw this look on a friend and it looked stunning on her, but it took a while for me to find the courage to wear this myself - the idea of blush below my upper cheekbones felt so out-there! But once you get used to the idea, this looks amazing!

Feel like trying this? Tell me what you think in the comments below!

Love,
Miss Diorista

P.S. Picture of the girl comes from http://www.activedesktopwallpapers.com/

Benefit - Dr. Feelgood

Ever heard of this product? Well, I bought it last summer, hoping it would do me some good... You see, like many, I have some slightly visible pores around and on my nose, and also like many, I want to hide them a bit. This product is supposed to "smooth away the appearence of fine lines while leaving skin feeling and looking more silky, flawless and matte to the touch." This is what Benefit claims it does, and yes, it actually does all those things, I can't deny that... and it's also blended with Vitamin C, which of course is a plus.

However, this product broke me out... not just a bit but rather badly. So despite how much I loved the pore-free look this product gave me, I had to give it up. Disappointing, to say the least.

Also, what's up with the smell? It's a rather strong, kind of menthol scent... doesn't smell bad, just not like anything you'd ever think of putting on your face.

And the packaging? Looks cute, but it is so impractical! How on Earth am I supposed to get the product out (which has a stiff tecture, like balm) with a sponge, without getting clumps of this on my face? I think Benefit Cosmetics sometimes think more about the way the packaging looks, than how it works, which is not good at all.
Product (65%) - 6/10
Value (10%) - 6.5/10
Would I repurchase? (15%) - 1/10
Packaging (10%) - 5/10

Overall - 4/10

Sadly, not a product I would recommend. However, this does not break everyone out, hopefully your skin will react better to this than mine did, just try it before you buy it!

Yours,
Miss Diorista

Saturday, February 5, 2011

MAC - Peacocky

Peacocky has finally arrived in Iceland - yay! I only got two things, though, since I'm saving up for the Wonder Woman collection, which I by the way can't wait for!

Those are the two things I got - Kissable Lipcolour in Love Peck, and Mega Metal Shadow in Odalisque.

Here is Love Peck. As you can see, it's a really dark colour - actually way darker than I'm used to, so I wear just the tiniest amount of it - I scrape almost all the product off, then apply a dot on the center of my lips, and sheer it out with my finger. Then I get a nice berry colour that I really love, and stays forever. So I really use this as a stain, as opposed to a lipcolour. But I do love it :)


I fell in love with Odalisque the moment I saw it. It's this really pretty turquise colour, so pigmented and shimmery. And actually rather wearable, since it's not super-bright.

And some swatches! To the left is Love Peck, and in the middle is Love Peck like I wear it. And finally to the right is Odalisque - it's so pigmented and smoothe!

What did you get from this collection? Any recs for Mega Metal Shadows that I need to get while they're still in store?

Yours,
Miss Diorista

Breakfast Cookies, Water and Fibres!

I'm late with the Friday health post - again! Sorry about that, but I actually have a pretty good excuse: I was looking for the recipe that I wanted to share with you this week, which comes from the book Sneaky Chef by Missy Chase Lapine. That book teaches you how to sneak healthy food (veggies, fruits, fish, whole-grains, etc.) into your kids' food. However, I found that I actually like to fool myself with those recipes, and my favourite from the book is this one. Enjoy those healthy cookies!
 
Breakfast Cookies
 
* 2 cups whole grain cereal flakes (I use All-Bran)
* 3/4 cup Flour Blend (1/4 cup white flour, 1/4 cup whole wheat flour, and 1/4 cup wheat germ)
* 1/2 teaspoon baking soda
* 1/2 teaspoon salt
* 1 teaspoon cinnamon
* 1 large egg
* 1/2 cup brown sugar
* 1/4 cup canola oil (I usually use EVOO though)
* 2 teaspoons pure vanilla extract
* 3/4 cup low-fat ricotta cheese (I usually use low-fat yogurt instead)
* Cinnamon sugar for dusting (if wanted)
Preheat oven to 400 degrees and line a baking sheet with parchment paper (or spray with oil).
Using a rolling pin, gently crush the cereal (in a sealed plastic bag) into coarsely crushed flakes.
In a large mixing bowl, whisk together Flour Blend, crushed cereal, baking soda, salt and cinnamon. In another bowl, whisk together egg, sugar, oil, vanilla, and ricotta cheese. Add the dry ingredients to the wet and mix just enough to moisten dry ingredients. Drop single tablespoonfuls onto the baking sheets, leaving about an inch between cookies. Flatten cookies with the back of a fork and then sprinkle tops generously with cinnamon sugar (you can skip this if you don't like it). Bake about 18 to 20 minutes, or until nicely browned and crispy around the edges.
Makes 16 to 18 large cookies.

These make for the best, guilt-free breakfast ever!

This week's challenge: Drink 8-10 glasses of water, every day.
This doesn't sound like a big deal, but drinking enough water is so important, and most of us don't drink more than 5 glasses, which is way too little. And it's also really fun to count your glasses of water throughout the day - believe me! :)

And finally, a few word on fibres.

 Great reasons why you should incorporate more whole-grains into your diet!

* They can possibly reduce the risk of cancer and heart-disease.

* Fibres help reduce the "shock" your body gets from eating sugar - which leads to you not getting the "afternoon snack craving".

* Fibres aid your digestion.

* Fibres help keep you satisfied for longer.

That's it for this week, stay healthy, people!
Love, Miss Diorista

P.S. Picture from http://www.knowledgera-theworld.blogspot.com/
And I have absolutely no idea why half of my post looks bolded - it doesn't look that way in the blogger format... any of you had this problem?
Related Posts Plugin for WordPress, Blogger...